Tuesday, October 18, 2011

Google Maps - Image Overlay Tutorial


I have recently been working with my father on expanding our family tree and adding information to individuals. One of the items he had was some annotated maps produced by his uncle showing the various pieces of property owned by the family in a small country town in NSW.

When I first saw these maps I immediately thought that it would be a good idea to have them overlayed onto a Google map to allow other members of the family to view them in context.

At the time, I had no idea of how to do this, but had seen the results on some other history websites. It was only when I watched the 'Map Your Business - Inside and Out' presentation from Google IO 2011 that I obtained the necessary knowledge and tools to produce these maps.

Although this presentation told me what tools were required to build the maps it was lacking in instructions on how to use the tools. I am hoping this blog post will provide a bit more guidance and some helpful hints on getting a result from these tools.

 The general workflow for producing a map overlay from a hand-drawn or annotated map is:
  • Obtain Source Maps
  • Geo Reference the Source Maps
  • Produce Overlay Tiles
  • Build Page to display Overlap Map on Google Maps.

Obtain Source Maps

My source maps were hand-annotated maps that had been scanned as TIFF files. I resized these images and uploaded them to my hosting account. This was necessary to use the Overlay-Tiler tool in the next section. For the purposes of this tutorial I will use a historic map from Gosford, NSW.

Geo-reference the Source Maps

The first step to displaying these maps as overlays on Google Maps is to determine the latititude/longitude for the corners of the map. To make this easier, the Maps team from Google has provided a tool called Overlay-Tiler. This is an interactive map where you can drag the corners of a overlay image around until it lines up with the underlying Google Map. The output of this tool is a GDAL_TRANSLATE command line script which you can run against the image to produce a geo-referenced TIFF.

Step 1.
Open the Overlay-Tiler web application in Chrome. The initial screen below allows you to specify the image location (published on web-site) and the initial location for the Google Map.
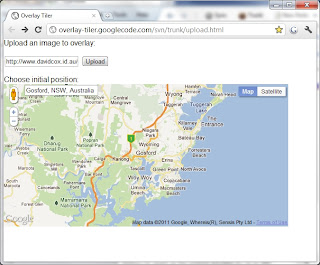
Step 1 - Provide Overlay Image and Initial Location
Step 2.
Pressing the Upload button will display the main screen for the Overlay-Tiler application. Your initial map will be displayed along with a semi-transparent overlay of your map image. This image is shown with control-points on three corners to allow you to drag and rotate the image to match the underlying Google Map.
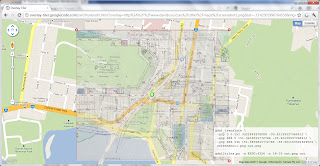
Step 2 - Overlay Image displayed on Google Map
Step 3.
By dragging the handles of overlay image and changing the zoom levels of the underlying Google Map it should be possible to line up major features of both maps. This can be quite time-consuming depending on the accuracy of the overlay map.
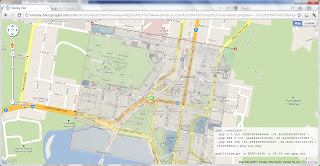
Step 3. Overlay Map re-sized and rotated to line-up with Google Maps
Step 4.
Once the overlay map has been aligned to the Google Map the GDAL_TRANSLATE command line will be displayed in the box in the bottom right-hand corner of the screen. Copy this command line to a safe place. I store these in the same directory as my maps.


The GDAL_TRANSLATE command line script will produce a new geo-referenced image. To run this command you will need to have the GDAL tools installed on your machine. Various versions of this toolset exist for most operating systems. I am using Windows so I downloaded and installed the desktop version of OSGeo4W (Open Source GEO for Windows). This will install an environment on your machine to run GDAL tools.

Step 5.
To produce the geo-referenced image, start the OSGeo4W command prompt and copy the command line script from Step 4 above. The '\' characters will need to be removed from the command script.
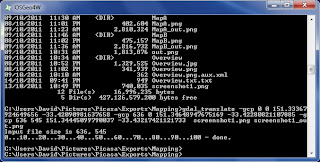
Step 5 - Run the GDAL_TRANSLATE script to produce the geo-referenced image.
The output from this section is a PNG image that includes embedded geo information.

Produce Map Tiles for your map

The final output from this process is a collection of tiles that can be referenced by the Google Maps API to overlay over the standard Google Maps tiles. A common way to produce these tiles is to use the GDAL2TILES Python script. This will produce a series of tiles that are named appropriately to publish and use in Google Maps API. As I do not currently have a Python environment installed I decided to use the MapTiler application which is a Graphical Interface to the GDAL2TILES script.

Step 1.
Run the MapTiler desktop application. Select the type of Tileset to create. We are creating a Google Map overlay so will select the first option.


Step 2.
Add a new Source Data file (Overlay Image created in the previous section). If the geo-referencing has occurred correctly, the Georeference column will show 'GCPs'.
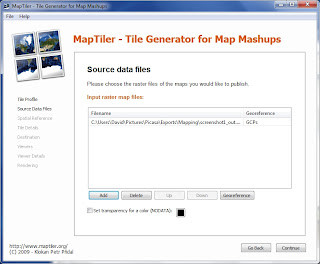
Step 2 - Add a Source Data File

Step 3.
Select a Spatial Reference System - for Google Maps overlays the most appropriate is WGS84.
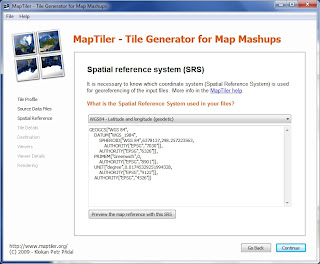
Step 3 - Confirm the Spatial Reference System

Step 4.
The next step in the MapTiler application is to select the Google Map zoom levels your overlay will be shown on. The application will default to the most appropriate zoom levels however you can adjust the levels   to suit. The higher zoom levels will require a higher resolution image to avoid 'jaggies'.

You can also select the file format at this point.
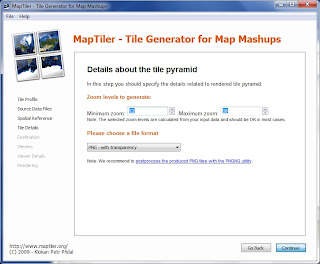
Step 4 - Tile Pyramid
Step 5
Enter the location where you would like the files to created.
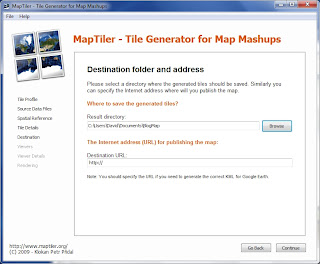
Step 5 - File Location
Step 6
Select the Web Viewers you would like MapTiler to generate. These are a HTML page that contains the appropriate code to display the overlay on either a Google Map or OpenLayers Map. These can be used as a base for your own pages.
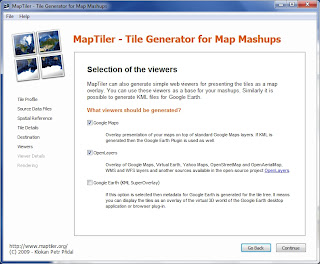
Step 6 - Selection of Web Viewer

Step 7
The next step in the process is to configure the Google Maps API Key. If you are testing only on your local machine you do not require a Maps API Key. If you want to publish on the web you will need to obtain a Google Maps API Key. This key is restricted to a single domain.
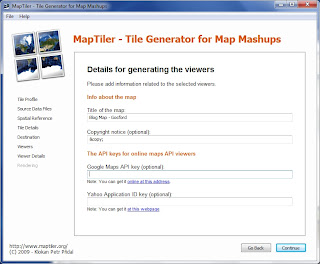
Step 7 - Enter Google Maps API Key

Step 8
The final step of the process is to Render the tiles. This will create a series of image tiles at each zoom level and the Map Viewer HTML.
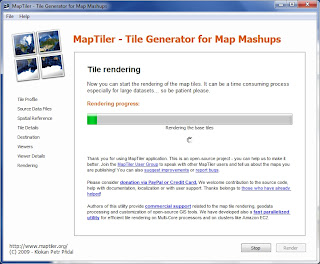
Step 8 - Render the Tiles
Publish your Map

The output from the MapTiler application is the collection of tiles (at various zoom levels) and one or two HTML Pages (depending on map options selected).
This directory structure can be copied directly to your web host, where it can be viewed as a full page map. Due to the simplicity of the HTML it is very strait-forward to modify the layout and contents of the page.

Conclusion

Using this technique to show overlay maps on Google Maps is a great way to show historic mapping in context of the current day. It also allows the overlay of other information (floor plans, evacuation maps)

The following examples show a Google Map and OpenLayers Map created as part of this tutorial.

Google Map Example
OpenLayers Example

I hope you find this tutorial useful. Feedback is always welcome.

Enjoy.

Wednesday, August 17, 2011

Android App Inventor - MIT Center for Mobile Learning

Google announced today that Google App Inventor will be a key part of the MIT Centre for Mobile Learning. MIT will take stewardship of the project and will actively develop and promote the service as a teaching tool.

Given the track record MIT have with open source software this is good news for the App Inventor community.

Thursday, August 11, 2011

Android App Inventor - Closing Down

With the winding down of Google Labs, Google has announced that Android App Inventor will no longer be supported by Google and will be converted to an Open Source application.

The service will remain available until at least the end of the year, however the URL will change in the near future. The viability of the product will depend on a benefactor taking control of the project and providing hosting.


Saturday, July 16, 2011

Android App Inventor - Load CSV File to Datastore

In a previous post I described how to use the TinyWebDB component within the Android App Inventor. This post described using the Google supplied TinyWebDB web service to store data on the web.

I was recently asked a question about how to pre-load the web service with data. Google provides a bulk-uploader service that you can use to load values from a file. After doing some research into the bulk-uploader it seemed to be very complex and I started to think of other ways to achieve a similar result.

The solution I created was using the web interface provided in the web service to upload a comma-separated file to the blobstore and subsequently loading the value into the datastore. I have attached the source code of this new version of the TinyWebDB web service to my source code page.

The main visible change to the application is the addition of a page to handle the uploads of the CSV files to the App Engine Blobstore. This uses a standard File Upload form control to display the File Open Dialog.

The page also displays the uploaded files along with an option to load the contents of the CSV file to the App Engine Datastore.


The main logic of the Blobstore Upload was courtesy of User: 010110110101 on StackOverflow who provided a great example of using Blobstore to store files in App Engine. I added this logic to the TinyWebDB web service code.

With the file uploaded to the blobstore, the web service then uses the Python CSV reader to read the file and load each key/value pair into the datastore. These key/value pairs are then available to the AppInventor application through the standard operations.

Feel free to use/modify this code for your own purposes. Enjoy.

My other App Inventor tutorials are:
App Inventor - Simple SMS
App Inventor - Location Services
App Inventor - Lists
App Inventor - TinyWebDB

Links
TinyWebDB Web Service
Blobstore Python Code - StackOverflow
CSV Reader in AppEngine - StackOverflow

Wednesday, June 29, 2011

Google+

After years of speculation, Google has released details of its answer to Facebook. Google+ aims to make sharing and dissemination of information easy and targeted, no more spamming all your friends with a link only a handful will appreciate.
We’d like to bring the nuance and richness of real-life sharing to software. We want to make Google better by including you, your relationships, and your interests.
 Information about the site is limited to the original blog post as well as a post on Wired describing the service. Access is limited to 'invite-only' at this time and there is a form available to register your interest.

Once I receive my invite I will post my impressions.

Links
http://googleblog.blogspot.com/2011/06/introducing-google-project-real-life.html
http://www.wired.com/epicenter/2011/06/inside-google-plus-social/

Sunday, June 12, 2011

Nearmap Aerial Mapping

Nearmap is a Photomap and location-based media company that provides high resolution aerial photography of Australias major population centres. These photographs are updated on a regular basis and the historical imagery is available.

A majority of the imagery is at 7.5cm resolution. This means that each pixel in the image represents 7.5cm of the earth surface. This means these images show more detail than many other mapping services.

Sample Image from Nearmap
One of the more unique features of the Nearmap service is the fact that the imagery is updated on a regular basis. Many metropolitan areas are updated on a monthy basis and the other major population centres are updated quarterly. Once captured and processed these new images are available very quickly. As the older imagery is also available it is possible to view and compare images from one month to the next.

Nearmap also provide a Javascript API  to allow developers to embed maps into their own webpages. I have a simple example of this API here.

Overall, I find this service extremely useful. It is well worth signing up to.

Saturday, May 14, 2011

Google I/O 2011 - Keynote Day 2

Here is the Day 2 Keynote from Google I/O.
Todays keynote was about Chrome, Chromebooks and HTML5.

Enjoy.

Wednesday, May 11, 2011

Google I/O 2011 - Keynote Day 1

For those developers not able to attend Google I/O 2011, here is the link to the Keynote for Day 1.

So far Google has announced:
More to come...

Tuesday, April 5, 2011

Android App Inventor - TinyWebDB

The next post in my series on Android App Inventor makes use of one the 'Not for Primetime' components. The TinyWebDB component allows you to store data on a web service. This means that the data can be accessed by the Android phone as well as a web application.

For testing purposes Google have provided a test web service at http://appinvtinywebdb.appspot.com/.  This service is a limited service and will only store 1000 entries. Due to these limitations it should NOT be used for your applications. Google provides instructions on how to create your own web service using Python and the Google App Engine.

The following example uses the application I built for the Android App Inventor - Lists post. This post will show how to store the contents of a list to the TinyWebDB web service and also retrieve the contents of a list from the TinyWebDB web service.


To begin we need add two buttons (btnStoretoWeb & btnGetListfromWeb).


We also need to add the TinyWebDB component. I have also added a Notifier component to allow us to return a message to the user when the data is stored.

 The TinyWebDB1 control needs to have the ServiceURL set to the debug URL: http://appinvtinywebdb.appspot.com/


Once the GUI has been configured we start the block editor and create the logic to save the list to the TinyWebDB.

To store a value on the web service we add the btnStoretoWeb.Click event. Within the event we call the TinyWebDB1.StoreValue method. This method has two parameters. The 'tag' parameter allows you to assign a key to the data. The second parameter is the list you are going to store.

The second event shown above is the TinyWebDB1.ValueStored event. When a value is stored in the TinyWebDB this event is triggered. I have used it to provide a notification to the user that it worked.

The next step is to retrieve the values from the web service and repopulate the list. In this case I have used a button to manually trigger the load of the list. In a production application you may want to put this code into the Screen.Initialize event.

In the btnGetFromWeb.Click event we call the TinyWebDB1.GetValue method with the name of the 'tag' we want to retrieve. In this case it is the MyStoredList tag.

Once the GetValue call is sent we need to wait for the TinyWebDB1.GotValue event to be called. This ensures that our application can remain responsive even if the call to the web service is slow to respond. When the event is triggered the application has access to the parameter valuefromWebDB. This contains the list we stored previously.

We can then store this value into the list. We also update the label to show the number of items in the list. I also load the ListPicker1 component.

I hope this tutorial has been helpful. Please feel free to comment if you need further information.

I have added a link to the App Inventor source here.

My other App Inventor tutorials are:
App Inventor - Simple SMS
App Inventor - Location Services
App Inventor - Lists

Commuting Time - Productive?

As I spend around 3 hours of my day on a train commuting I found this article by Dave Burke very interesting. It shows that with the right technology it is possible to be productive even when you re travelling.


In the past I have typically used the time on the train to read or sleep but due to the better mobile data plans I am able to login to services such as App Inventor to  develop applications for my Android phone.

Now instead of 3 hours of wasted time I can be productive.


Friday, March 4, 2011

Android App Inventor - Lists

This post will explain the use of lists and list controls in Android App Inventor.

There are three parts to this post. In the first part I will examine how to create a list and add items to the list via the GUI, the second part will show how to make use of items in a list directly and thirdly I will show how to link a list to a GUI list control to select and display items.

To create a list we go to the Block Editor and define a new variable called 'list'. We can then call a 'make a list' method which will create a blank list.


In the GUI add a textbox and button. The textbox will be where you add the value you want added to the list. The button will call the btnAddText.Click event to add the text in the textbox to the list.

The code will also update the label underneath the button to show the current number of items in the list.

The next step is to make use of this list. In the screenshot below I have added a button and a label to the screen.  The label is not visible as it is empty at the moment.

When the button is selected on-screen the btnRandom.Click event is called. This event will randomly select one of the list items and display it in the label. The call to the random function is surrounded by an IF block to ensure that the list is not empty.

Finally, the last thing to do is associate this list with an on-screen control that we can access to select items.

On the GUI a ListPicker control has been added. We also add a Label to show the returned value.

This control will display a list of values and when the user selects one it will return the value back to the user. To associate a List with a ListPicker control we call pass the list into the ListPicker.Elements method.

In our example this is done as part of the btnAddText.Click method. This ensures that the list control is updated each time an item is added to the List.

Now that we have associated the list to the ListPicker control we can use a ListPicker.AfterPicking block to show the returned value on the Label.

The following is some screenshots showing the overall GUI design with the names of the controls.


I hope this tutorial has been helpful. Please feel free to comment if you need further information.

My other App Inventor tutorials are:
App Inventor - Simple SMS
App Inventor - Location Services

Thursday, February 24, 2011

Android App Inventor - Simple SMS

Recently, I have been doing some further development on Android App Inventor. My focus for this work was getting the application to send and receive SMS messages. To aid others in doing this I put together this tutorial which shows this.

The first part of the tutorial shows how to send an SMS from within an App Inventor App. This is relatively simple and requires a a couple of text boxes (Mobile Number & Message Text) and a button to press to send the message.

You will also need to add a non-visual Texting component to the form. 


Once the form has been created, the Blocks required to send a message should be configured as in the following image.


This block of code is executed when the user clicks the Send Message button. The first two actions are to set the Mobile Number and Message text on the Texting object to the values in the text boxes.

The last action calls the Texting.SendMessage method to actually send an SMS. Simple.

Note: This code does not do any error checking or validation. Erroneous data may cause the application to Force Close.

The second part of the tutorial will show how to make an App Inventor application respond to an SMS that it receives. For this application there is no GUI as the application handles the logic in the background. All we need are some blocks to intercept the SMS messages received.


This block of code is executed when the phone gets a SMS message.

The MessageRecieved method exposes two values: number and messageText. You can store these in a couple of variables.


The second thing this block does is to check the message to see if it contains the text 'Status?' If this text is in the message it will create a new TextMessage using the received number and respond with the message 'All Good!'. This is a simple application for this but could be used for such things as responding with a user location or responding with a simple message if the user is unavailable.

I hope this tutorial has been helpful. Please feel free to comment if you need further information.

I have added a link to the source code here.

My other App Inventor tutorials:
App Inventor - Location Services
App Inventor - Lists

Sunday, February 20, 2011

GPS Visualiser

One of the online tools I use regularly while working with GPX files and mapping is the GPS Visualizer website. The GPS Visualizer website is a collection of tools that work with GPX files to produce maps and profiles of GPS tracks.

The main functions I use on the website are:

1. Draw a Map

The Draw a Map page allows you to select a GPX file and display it overlayed on a variety of different map types including Google Streetmap, Google Satellite and Google Terrain. Once created the image can be captured as an image file.

2. Draw a Profile

The Draw a Profile page allows you to select a GPX file and display a elevation profile for this GPX file. The profile can be colorcoded to show elevation, speed, heart rate and other data points. Where a GPX file does not include elevation data the form gives the ability to add elevation data from a DEM dataset.

3. Lookup Elevations

The Lookup Elevation page allows you to recreate the elevation data for a GPX track using a DEM dataset. This is useful if the existing GPX file does not have elevation data or the data is incomplete. Rather than directly rendering a profile (as in point 2) the page gives you the option to save a new GPX file.

As well as these easy to use functions there are a multitude of ways to make use of the GPS Visualizer service. If you are using GPX files on a regular basis this service is a very handy addition to your tools.